在上一篇文章我们讲了wordpress设置页的编码,这篇文章里我们讲oauth2鉴权,也就是从osc open api中获取access token的过程。有了access token ,我们才能调用osc的相关接口。
原理和流程请先阅读http://www.oschina.net/openapi/docs ,你首先需要理解这个流程,然后才能考虑用wordpress实现。其中上一节出现的
$this->callback_url = add_query_arg('callback', 'oscpress', site_url());
就是你填在osc open api中的回调url http://域名?callback=oscpress。首先我们向构造函数里添加两个新的action,
add_action('query_vars', array(&$this, 'add_query_vars'));

add_action("parse_request", array(&$this, 'callback'));
接下来我们来写回调的方法:
// 增加一个新的公共查询参数
public function add_query_vars($public_query_vars) {

    $public_query_vars[] = 'callback';
    return $public_query_vars;

}

// osc open api url的回传后执行
public function callback($request)
{
    if (isset($request->query_vars['callback']) && $request->query_vars['callback'] == 'oscpress') {
        $this->_callback();
        exit();
    };

}

// 实际执行的回调
protected function _callback(){

}
add_query_vars 方法是加入了一个新的查询参数,不用$_GET[‘callback’],这样利于日后使用url重写.
不在 callback 直接写逻辑是为了更清晰,在callback中负责各种前置,后置的操作,比如记录到日志,发送邮件等,而_callback只要集中处理回调的逻辑就行了。
接下来我们写一个生成引导用户的验证url的方法,这样当用户点击这个url之后,会跳转到osc的用户授权页。用户授权完成后就能取得access token了
// 生成引导的验证url
protected function _generate_authorize_url() {

    $settings = (array) get_option( 'oscpress_settings' );
    if(empty($settings)) {
        return false;
    }
    $authorize_url = $this->api_site . '/action/oauth2/authorize';
    $args = array(
        'response_type' => 'code',
        'client_id' => $settings['appid'],
        'redirect_uri' => $this->_callback_url,
        'state' => wp_create_nonce($this->_state),
    );
    $authorize_url .= '?' . http_build_query($args);

    return $authorize_url;
}
然后改造一下settings_section_text,让它显示授权的链接
public function settings_section_text(){
    echo "<hr/>";
    $authorize_url = $this->_generate_authorize_url();
    if(false === $authorize_url){
        echo "<em>填写应用的id及私钥</em>";
    }else{
        printf("<em><a href='%s'>点击授权</a></em>",$authorize_url);
    }

}

点击后会出现osc的授权页,留意url:

用户授权后会跳转回我们的网站,这时我们可以从url中获得code和state参数,接下来在回调方法中验证state参数,并将code参数跟我们的appid,appsecret等作为请求参数,向接口再发送一次请求,换取access token,最后保存token。
// 实际执行的回调
protected function _callback(){
    if ( isset($_GET['code']) && isset($_GET['state']) && $this->_verify_state($_GET['state'])) {
        $code = $_GET['code'];

        $url = $this->api_site . '/action/openapi/token';
        $settings = get_option( 'oscpress_settings' );
        $args = array(
            'client_id' => $settings['appid'],
            'client_secret' => $settings['appsecret'],
            'grant_type' => 'authorization_code',
            'redirect_uri' => $this->_callback_url,
            'code' => $code,
            'dataType' => 'json'
        );

        $response = wp_remote_post($url, array('body' => $args));
        if (!is_wp_error($response) && $response['response']['code'] == 200) {
            $this->_save_token($response['body']);
            $redirect_url = admin_url('admin.php?page=oscpress_admin_settings');

            wp_redirect($redirect_url);
            printf('<script>window.location.href="%s";</script>', $redirect_url);

        } elseif (is_wp_error($response)) {
            echo "请求出错:" . $response->get_error_message();
        } else {
            echo "未知错误";

        }

    } else {
        echo "回调失败: 参数错误";
    }
}
这样就完成了回调的处理。其中为了保证浏览器兼容性,使用了http响应头跳转和前端script跳转。
需要加入了两个新的protected方法:
protected function _verify_state($state)
{

    if ($state !== wp_create_nonce($this->_state)) {
        return false;
    }
    return true;
}
protected function _save_token($token_arr)
{
    update_option('oscpress_token', $token_arr);
    update_option('oscpress_token_update_at', time());
    return true;

}
这时你再点击设置页面的链接,授权后跳转回设置页,似乎什么也没发生?
其实不然,现在系统已经保存了你的access token了,只是你看不到而已,这时我们改写
settings_section_text的内容,显示授权用户的osc信息和access token. 这里要用到osc open api获取用户信息接口,代码如下:
public function settings_section_text(){
        echo "<hr/>";
        $authorize_url = $this->_generate_authorize_url();

        if(false === $authorize_url){
            // 未填写应用id和私钥
            echo "<em>填写应用的id及私钥</em>";
        }elseif( $access_token = $this->_get_access_token() ) {
            // 已获取access token,显示个人信息
            $response = $this->_get_openapi_user();
            if(is_wp_error($response)) {
                echo $response->get_error_message();
            }
            $info_obj = json_decode($response['body']);

?>
            <span>

                <img align="absbottom" src="<?php echo $info_obj->avatar; ?>"/><br/>
                <a href="<?php echo $info_obj->url; ?>" target="_blank"><?php echo $info_obj->name; ?></a>
            </span>

            <p>Access Token: <?php echo $access_token;?></p><hr/>
<?php

        }else{
            // 未授权,显示授权链接
            printf("<em><a href='%s'>点击授权</a></em>",$authorize_url);
        }

    }
新加入两个protected方法:
// 获取存储的access token
protected function _get_access_token(){
    $json_str = get_option('oscpress_token',false);
    if(false === $json_str) {
        return false;
    }

    $obj = json_decode($json_str);
    $update_ts = get_option('oscpress_token_update_at',0);
    if($obj->expires_in + $update_ts <= time() ){ // 过期
        return false;
    }

    return $obj->access_token;
}

// 获得用户信息
protected function _get_openapi_user()
{
    $url = $this->api_site . '/action/openapi/user';
    $args = array(
        'access_token' => $this->_get_access_token(),
        'dataType' => 'json'
    );
    $response = wp_remote_post($url, array('body' => $args,'sslverify'=>false));
    return $response;

}
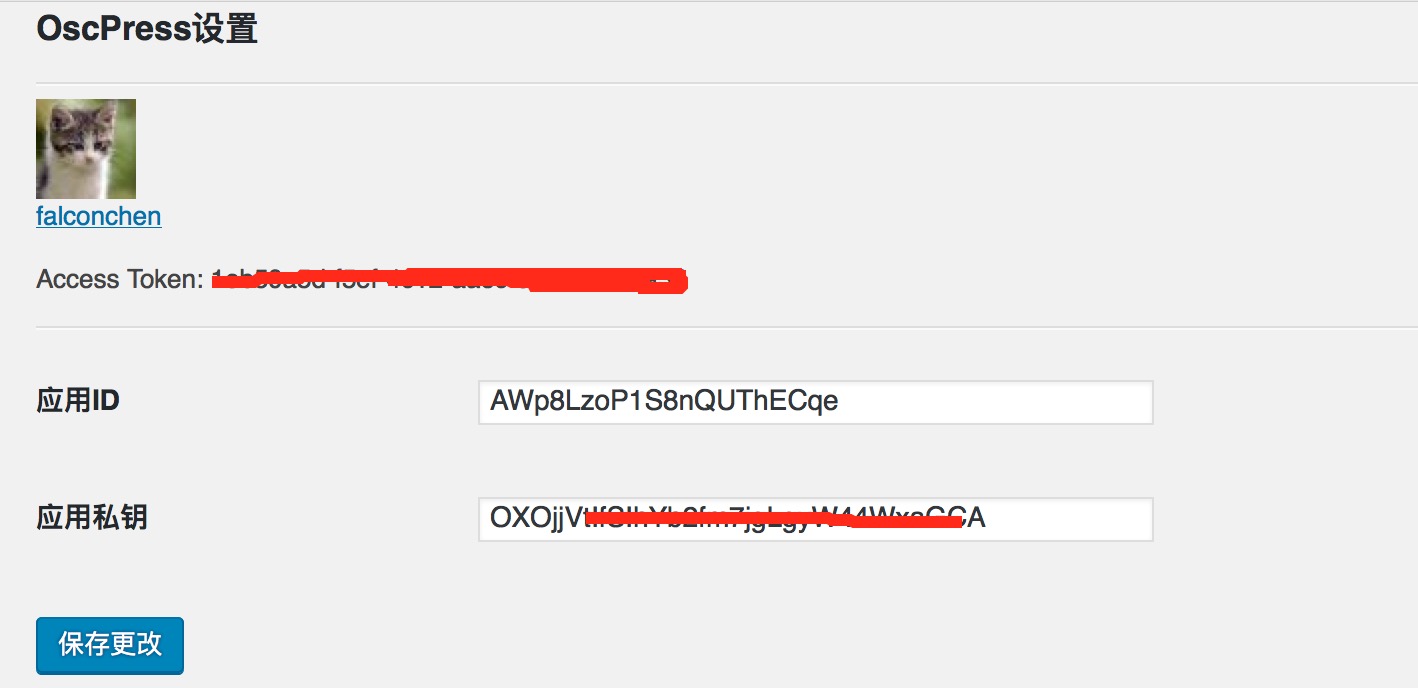
完成后刷新页面,效果如图:
看起来很不错,不过好像差了些什么东西,比如想清除授权,或者换一个用户怎么办?
OK,接下来我们做一个清除授权的链接,修改一下settings_section_text方法,把清除授权的链接放进去,同时小小修改一下界面。当然这个清除只是删除保存在本地的access token,并不是从open api的服务端清除。
<span>

    <img align="absbottom" src="<?php echo $info_obj->avatar; ?>"/><br/>
    <p><a href="<?php echo $info_obj->url; ?>" target="_blank"><?php echo $info_obj->name; ?></a></p>
    <p><a href="<?php echo $this->_clear_authorize_url(); ?>">清除授权</a></p>
</span>
然后我们写两个清除授权相关的函数:
// 生成取消授权url
protected function _clear_authorize_url(){
    return admin_url('admin.php?page=oscpress_admin_settings&action=clear_osc_authorize&_wpnonce=' . wp_create_nonce('clear_osc_authorize'));
}

// 清除授权信息
protected function _clear_authorize()
{
    return delete_option('oscpress_token') && delete_option('oscpress_token_update_at');
}
最后我们在admin_init方法加入实际清除的逻辑,放在
register_setting( 'oscpress_settings_group', 'oscpress_settings',array($this,'sanitize_callback') );这句的前面。
if($_REQUEST['action'] && $_REQUEST['action']=='clear_osc_authorize'){
    if (check_admin_referer('clear_osc_authorize')) {
        if($this->_clear_authorize()){
            add_settings_error('oscpress_settings', 'clear_osc_authorize_failed', "授权信息清除成功", 'updated');
        }
    }
}
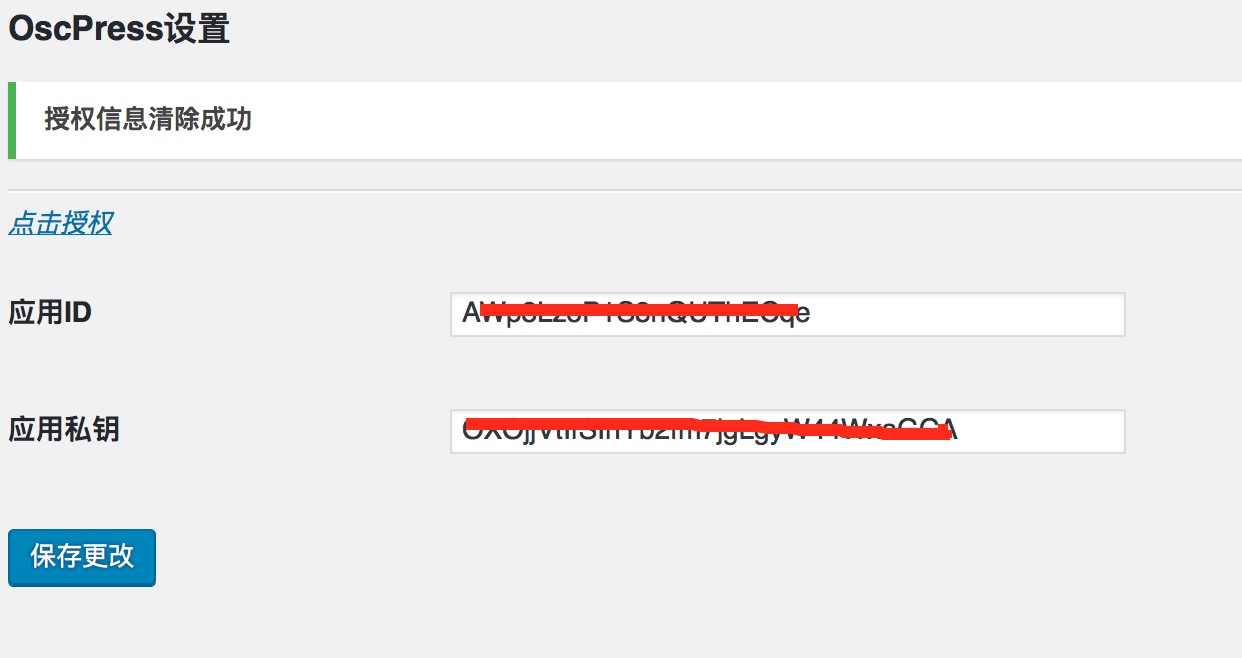
这里用到了check_admin_referer函数,这个是用来防csrf攻击的。清除成功后会显示一条通知。如图:
好了,osc open api的授权就先到这里了。关于refresh token和其他的内容集中会单独放一篇的补充。